Rauheitsmessungen von Edelstahloberflächen (EN)
Although Ra values are commonly used to describe surfaces, the limits of this indicator should not be forgotten. Also the notation is important: “Ra ≤ 0.5 μm”, for instance, does not have the same meaning as “Ra max 0.5 μm”. Surface designations such as “2B” according to EN or “No 4 finish” according to ASTM encompass relatively large ranges of surface roughness. Products which have identical designations but come from different batches or different suppliers may have noticeably different roughness characteristics. In architectural applications where surface appearance is of great importance roughness values alone are insufficient to characterise a surface. In this case, it is recommended that samples should be exchanged between the customer and the supplier and made part of purchase orders, to avoid later disagreement. Reprinted from Euro Inox with permission.
Introduction
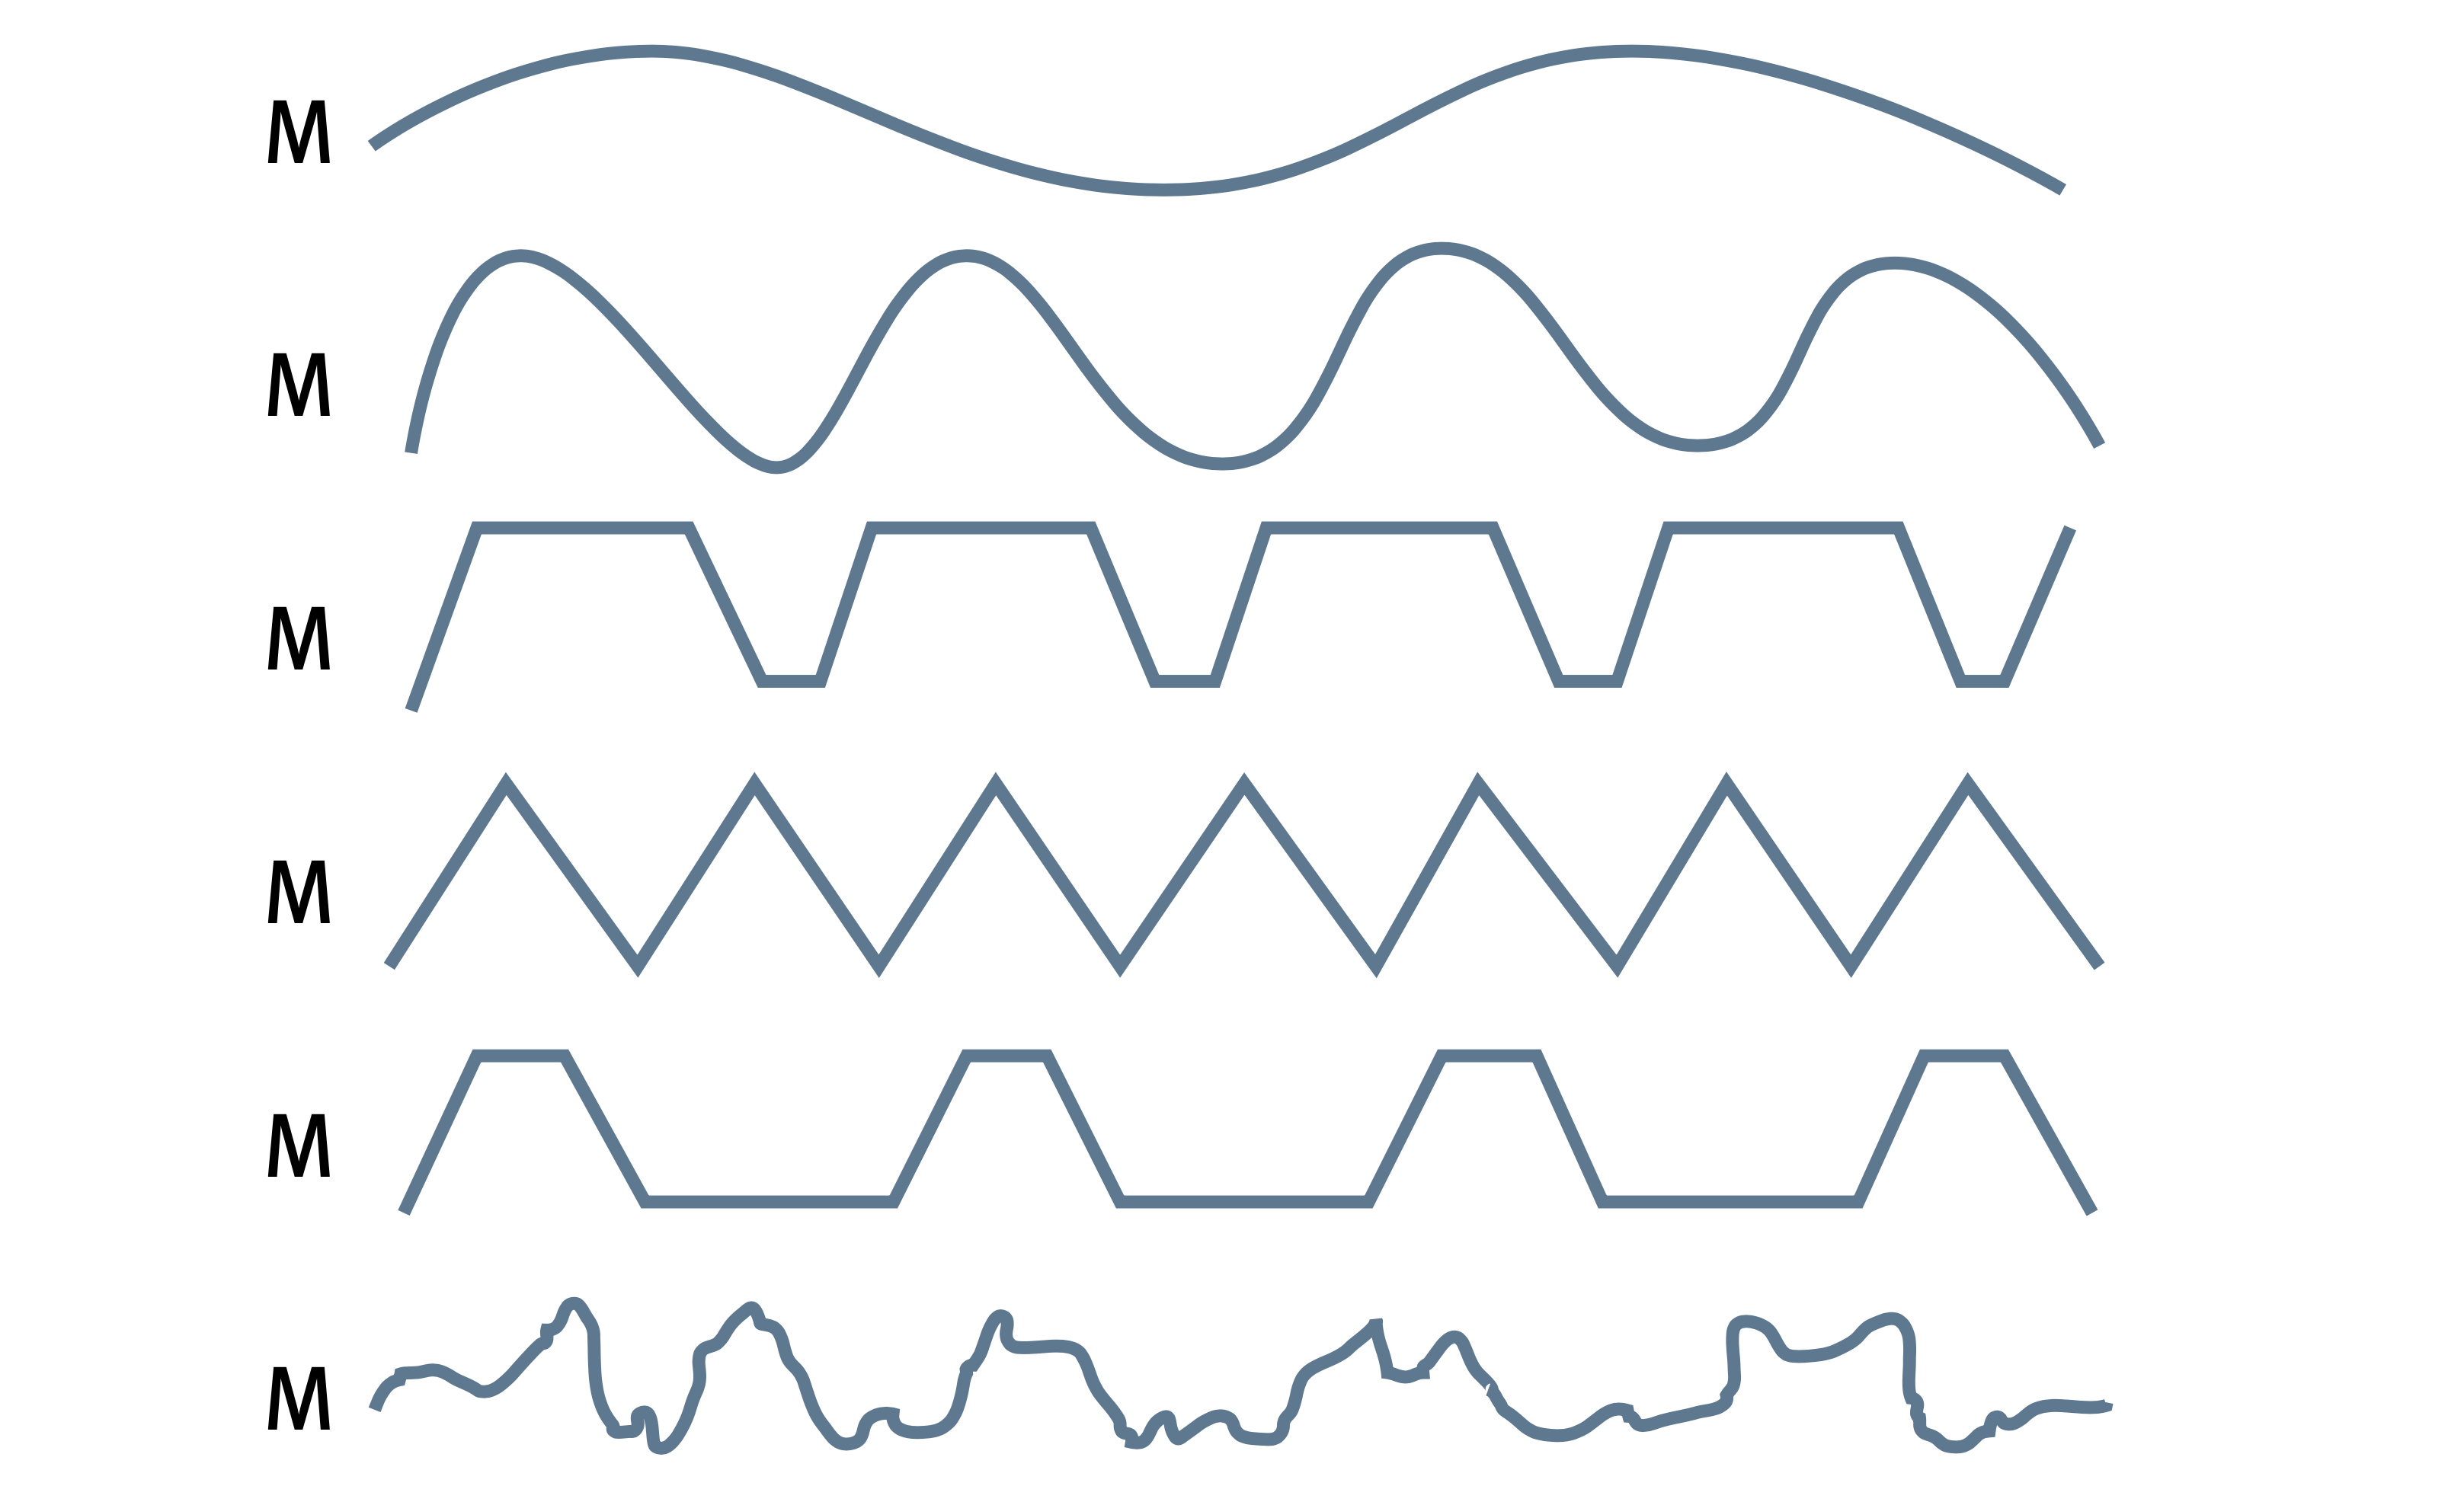
Surface roughness is a measure of the texture of a surface. It is quantified by the vertical deviations of a real surface from its ideal form. If these deviations are great, the surface is rough, if they are small, the surface is smooth. Roughness is typically considered to be the high-frequency, short-wavelength component of a measured surface. In practice, it is often necessary to know both the amplitude and frequency to ensure that a surface is fit for purpose [1].
Ra value
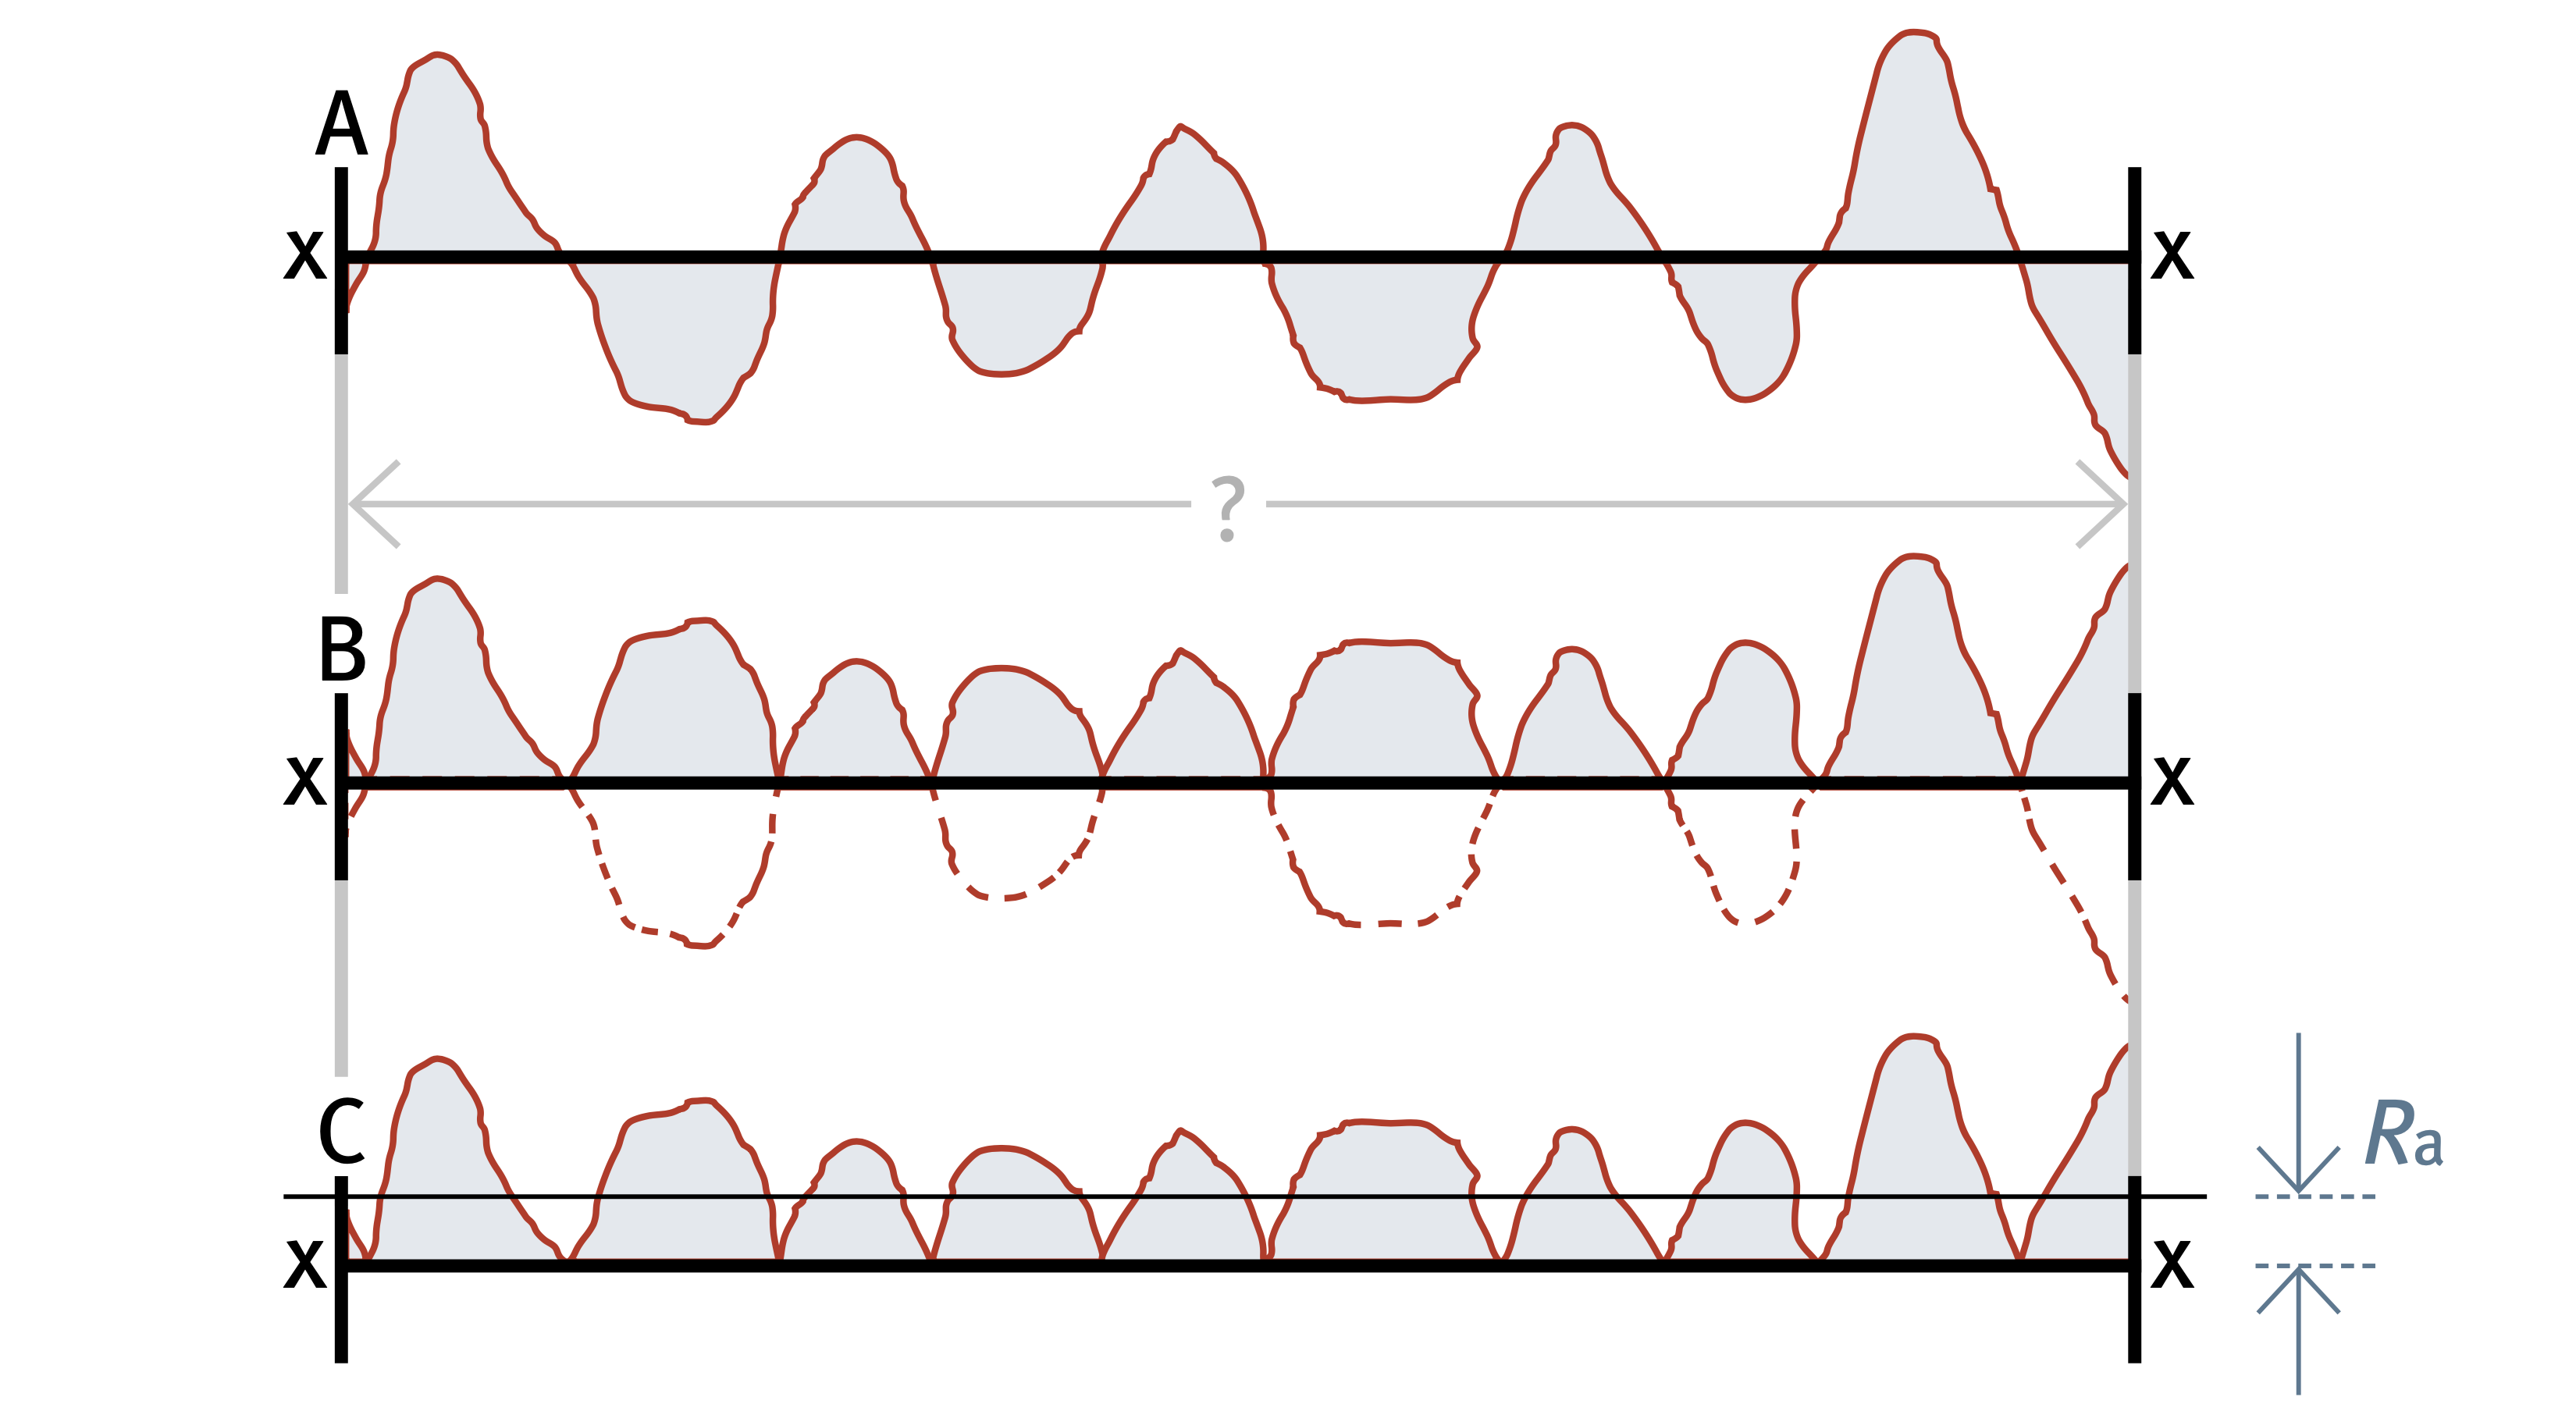
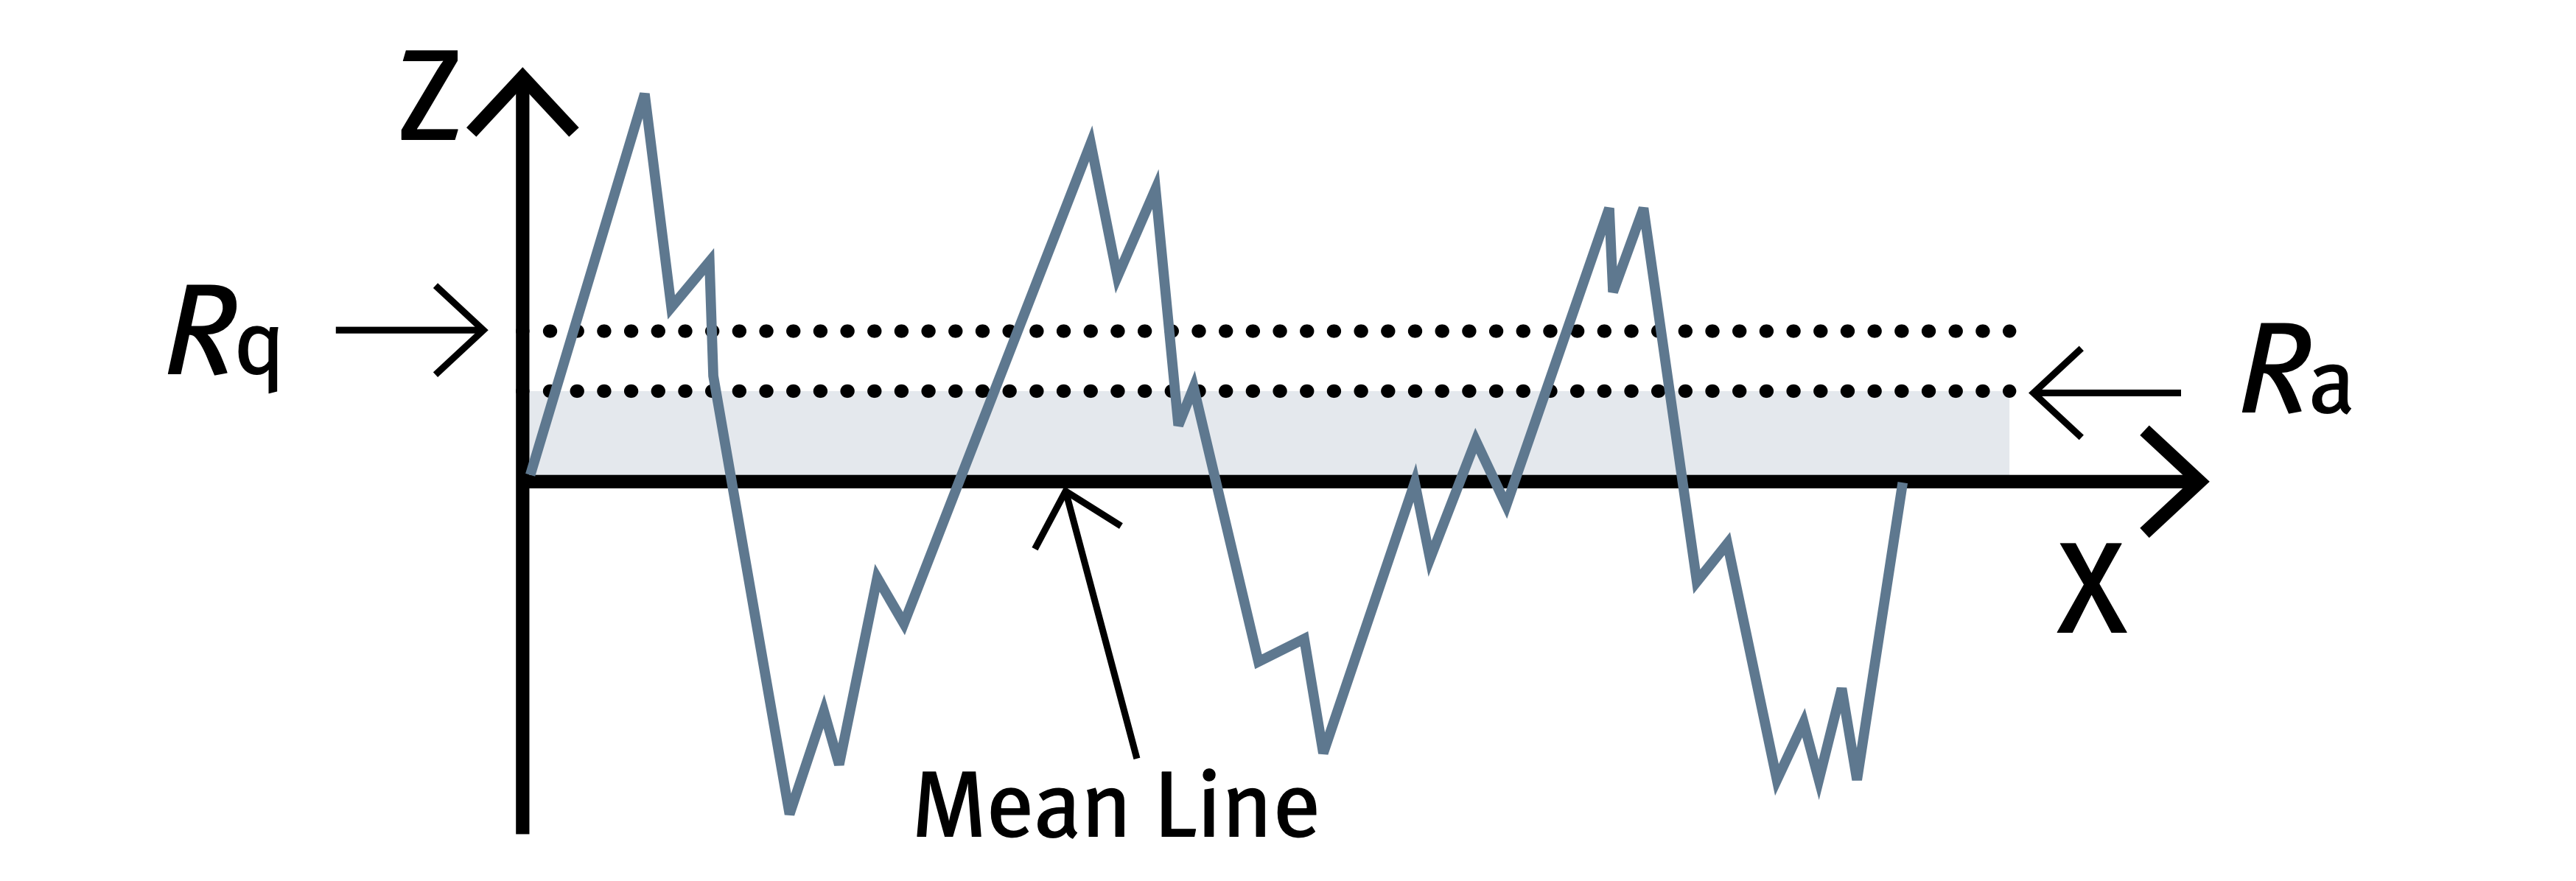
The roughness of a surface has most commonly been measured by an instrument in which a stylus travels across the surface, the movement of the stylus is amplified and the signal recorded. The result is generally expressed as Ra or average roughness and is the arithmetic average value of the deviation of the trace above and below the centre line. The value of Ra is normally measured in micrometres. ISO standards use the term CLA (Centre Line Average). Both are interpreted identically [2].

Although Ra is a useful average, it does not differentiate between peaks and valleys. Very different profiles can have the same Ra value. In technical specifications, the upper limit or maximum value of the parameter is often found during inspection. For requirements specified by the upper limit (e.g. Ra ≤ 0.6 μm) of a parameter, the surface is considered acceptable if not more than 16% of all measured values of the selected parameter (based on an evaluation length) exceed the value specified in the drawings or the technical product documentation. To designate the upper limit of the parameter, the symbol of the parameter is used without the “max” index. For requirements specified by the maximum value (e.g. Ra max. 0.6 μm) of the parameter during inspection, none of the measured values of the parameter, over the entire surface under inspection, should exceed the value specified in the drawings or in the technical product documentation. To designate the maximum permissible value of the parameter, the “max” index has to be added to the symbol of the parameter (for example Ra max). Control of surface roughness can be performed quickly and easily using the simplified procedure for roughness inspection given in Annex A, EN ISO 4288 [5], [6]. Only the upper limit of roughness is usually established – not a lower limit. An exception is cylinder bores where oil is retained in the surface profile and a minimum roughness is required.
SafeFoodFactory:
to make a surface cleanable to microbial level, EHEDG is recommending an Ra of below 0.8 micrometer, in absence of crevices, scratches etcetera.

Rz value
An alternative measure of surface roughness is the Rz value. ISO 4287-1:1997 [7] defines Rz as the maximum height of profile. Older documents and surface roughness measuring instruments may still refer to Rz according to the 1984 version of this standard, which indicated the “ten point height of irregularities”. Typographical detail is important: “Rz” refers to the current, “Rz” to the obsolete version of the standard.
Rq value
Another factor for the description of surface roughness, Rq (sometimes also RMS) measures the root-mean-square deviation of a profile. The terms, definitions and parameters for determination of surface roughness are again provided in EN ISO 4287 [7].

Table 1. Surface roughness for different stainless steel finishes [9], [10], [11], [12].
| Surface finish EN 10088-2 | Type of process route | Surface roughness as in EN 10088-2 | Notes |
|---|---|---|---|
| 1D | Hot rolled, heat treated, (shot blasted) and pickled. Rough and dull. | Ra typically in the 3.50-7.50 μm range | |
| 2D | Cold rolled, heat treated, pickled. Smooth. | ||
| 2B | Cold rolled, heat treated, pickled, skin passed. Smoother than 2D. | Ra typically in the 0.30-0.50 μm range | |
| 2G | Ground Grade of grit or surface roughness can be specified. Unidirectional texture, not very reflective. |
||
| 2R | Bright annealed Cold rolled, bright annealed. Smooth, bright, reflective. |
||
| 2J | Brushed or dull polished Grade of brush or polishing belt or surface roughness can be specified. Unidirectional texture, not very reflective. |
||
| 2K | Satin polish | Transverse Ra < 0.5 μm | |
| 2P | Bright polished The finish is achieved by mechanical polishing. The process of surface roughness can be specified. It is a non-directional finish, reflective, with a high degree of image clarity. |
It is worth keeping in mind that incorrect surface treatment can result in irreversible damage. As an example, there is no repair procedure for a process tank delivered with a cold-rolled, bright finish (2B finish, ASTM A 480/A 480M) that exceeds a specified maximum Ra value [6].
| Surface finish ASTM A 480/480 M | Description | Notes |
|---|---|---|
| 3 | A linearly textured finish that can be produced by either mechanical polishing or rolling. A skilled operator can generally blend this finish. | Average Ra may generally be up to 1 μm* |
| 4 | A linearly textured finish that may be produced by either mechanical polishing or rolling. A skilled operator can generally blend this finish. | Average Ra may generally be up to 0.6 μm* |
| 5 | Architectural finishes. These are a separate category and can be negotiated between buyer and seller, as there are many techniques and finish variations available throughout the world.* | Transverse Ra value should not exceed 0.5 μm |
| 6 | This finish has a soft, satin appearance, typically produced by Tampico brushing of a No. 4 finish. | |
| 8 | This is a highly reflective, smooth finish, typically produced by polishing with successively finer grit abrasives, then buffing. Typically, very faint buffing or polishing lines may still be visible on the final product. Blending after assembly may be done by buffing. |
*Surface roughness measurements differ with different instruments, laboratories and operators. There may also be overlap on measurements of surface roughness for both No. 3 and No. 4 finishes.
| Surface finish in fabrication | Average Ra μm |
|---|---|
| Bead blasted | 1.00-6.00 |
| Bored, turned | 0.40-6.00 |
| Electropolished | 0.10-0.80 |
It should be noted that the values in the table are for orientation only and that they vary between different producers and typical surface finish. It is suggested that, as concerns surface roughness requirements, a possible Ra acceptance criterion should be explicitly stated, since surface finish as defined by the standards only defines the process route (such as cold rolled, heat treated, pickled, skin passed for 2B) and surface roughness can vary from one producer to another.
** Table 2. Comparison of grit size and surface roughness – approximate values [13].**
| Grit size | Rq μm | Ra μm |
|---|---|---|
| 80 | 2.02 | 1.80 |
| 120 | 1.47 | 1.32 |
| 150 | 1.20 | 1.06 |
| 180 | 0.86 | 0.76 |
| 240 | 0.43 | 0.38 |
| 320 | 0.36 | 0.30 |
| 500 | 0.20 | 0.18 |
| 600 | 0.15 | 0.13 |
SafeFoodFactory, concerning table 2, Grit size and roughness (from ([13]):
according to the latest measurements the modern grinding paper is too good. I.e. grinding to below 0.8 micrometer Ra can sometimes only be achieved with Grit size 240.
Relevant standards
ISO 1302:2002
Geometrical Product Specifications (GPS) – Indication of surface texture in technical product documentation (ISO 1302:2002)
EN ISO 3274:1997.
Geometrical product specifications (GPS) – Surface texture: Profile method – Nominal characteristics of contact (stylus) instruments (ISO 3274:1996).
EN ISO 4287:1998/AC:2008.
Geometrical product specifications (GPS) – Surface texture: Profile method – Terms, definitions and surface texture parameters (ISO 4287:1997/Cor 1:1998/Cor 2:2005).
EN ISO 4288:1997.
Geometrical product specifications (GPS) – Surface texture: Profile method – Rules and procedures for the assessment of surface texture (ISO 4288:1996).
EN ISO 5436-1:2000.
Geometrical Product Specifications (GPS) – Surface texture: Profile method; Measurement standards – Part 1: Material measures (ISO 5436-1:2000).
EN ISO 5436-2:2012.
Geometrical product specifications (GPS) – Surface texture: Profile method; Measurement standards – Part 2: Software measurement standards (ISO 5436-2:2012).
EN ISO 12085:1997/AC:2008.
Geometrical product specification (GPS) – Surface texture: Profile method – Motif parameters (ISO 12085:1996/Cor 1:1998).
EN ISO 12179:2000/AC:2008.
Geometrical Product Specifications (GPS) – Surface texture: Profile method – Calibration of contact (stylus) instruments (ISO 12179:2000/Cor 1:2003).
EN ISO 13565-1:1997.
Geometrical product specifications (GPS) – Surface texture: Profile method; surfaces having stratified functional properties – Part 1: Filtering and general measurement conditions (ISO 13565-1:1996).
EN ISO 13565-2:1997.
Geometrical product specifications (GPS) – Surface texture: Profile method; surfaces having stratified functional properties – Part 2: Height characterization using the linear material ratio curve (ISO 13565-2:1996)
EN ISO 13565-3:2000.
Geometrical Product Specifications (GPS) – Surface texture: Profile method; surfaces having stratified functional properties – Part 3: Height characterization using the material probability curve (ISO 13565-3:1998)
ISO 16610-21:2011.
Geometrical product specifications (GPS) – Filtration – Part 21: Linear profile filters: Gaussian filters
References
[1]
Surface roughness, Wikipedia, http://en.wikipedia.org/wiki/Surface_roughness
[2]
Surface Roughness Finish (Review) and Equations, http://www.engineersedge.com/surface_finish.htm
[3]
Boen, P., Abrasieve voorbereiding van metaal oppervlakken voor verlijming, 3M, company documentation
[4]
Rodriguez, V., Sukumaran, J., Ando, M., De Baets, P., Roughness measurement problems in tribological testing, Sustainable Construction and Design 2011
[5]
EN ISO 4288:1997 Geometrical product specifications (GPS) – Surface texture: Profile method – Rules and procedures for the assessment of surface texture (ISO 4288:1996)
[6]
Frantsen, J. E., Mathiesen, T., Specifying Stainless Steel Surfaces for the Brewery, Dairy and Pharmaceutical Sectors, Nace Corrosion, 2009, Paper 09573
[7]
EN ISO 4287:1998 Geometrical product specifications (GPS) – Surface texture: Profile method – Terms, definitions and surface texture parameters (ISO 4287:1997)
[8]
Roughness Parameters, http://www.rubert.co.uk/faqs/roughness-parameters/
[9]
Surface Textures of Stainless Steels, Technical Focus,
http://airprocesssystems.com/pdf/eirich/surfacetextures.pdf
[10]
ASTM A 480/480M, Standard Specification for General Requirements for Flat-Rolled Stainless and Heat-Resisting Steel Plate, Sheet, and Strip
[11]
EN 10088-2, Stainless steels – Part 2: Technical delivery conditions for sheet/plate and strip of corrosion resisting steel for general purposes
[12]
SSINA, http://www.ssina.com/finishes/sheetsamples.html
[13]
Surface Roughness Measurements, KEPCO, https://kepcoinc.com/wp-content/uploads/2019/04/LC_surface-roughness-measurements.pdf